Exploring Freelancing
Navigate freelancing as a developer; find clients, manage contracts, ensure timely payment, and learn from experiences!
LazyVGrid and LazyHGrid layouts in SwiftUI were recently announced during WWDC 2020, and I’m so excited to share with you a simple tutorial to get you started with them!
Here’s the demo project to start with.
Note: Using these APIs requires macOS 10.14.5+ and Xcode 12+.
When you open the project, explore the 18 pleasing landscapes in
Assets.xcassets, named as noaa[number] for the sake of simplicity. Shoutout
to the National Oceanic and Atmospheric Administration (NOAA) for such beautiful
pictures.
LazyVGrid
From the latest documentation, a LazyVGrid is a “container view that arranges its child views in a grid that grows vertically, creating items only as needed.”
An item in a grid is known as a GridItem, which the
documentation
states is nothing but a “description of a single grid item, such as a row or a
column.” There are many parameters for it.
Open the Xcode project inside of the folder LazyVGrid — Beginning. There’s
already a file called ImageView, which is to style the beautiful landscapes
when showing in a grid.
Create a new SwiftUI View and name it VerticalGrid. A vertical grid takes a
few inputs, such as the number of columns, alignment, spacing, etc. The most
important is columns. You create a columns variable of the type GridItem
and initialize it as an array of flexible repeating items with the count as
three. Three represents the number of columns in this case.
The case of flexible(minimum: CGFloat = 10, maximum: CGFloat = .infinity) has
a default maximum size of infinity.
Now, you need a ScrollView flowing in a vertical direction. You provide
LazyVGrid with the number of columns and then use ForEach to specify the
total of items in the grid.
The number of columns is two in our case, so after filling two images in the
first row of ImageView, it moves to the second row and fills the next two
images and so on until the grid is complete.
struct VerticalGrid: View {
    var columns: [GridItem] =
        Array(repeating: .init(.flexible()), count: 2)

    var body: some View {
        NavigationView {
            ScrollView(.vertical) {
                LazyVGrid(columns: columns) {
                    ForEach((1...18), id: \.self) { number in
                        ImageView(number: number)
                    }
                }
            }
            .navigationTitle("Landscapes")
        }
        .navigationViewStyle(StackNavigationViewStyle())
    }
}
LazyHGrid
Create another View and name it HorizontalGrid.
The exact same procedure is used for creating aLazyHGrid. Now, you need a
ScrollView flowing in a horizontal direction this time.
You provide LazyHGrid with the number of rows and then use ForEach to
specify the total of items in the grid. The number of rows is three in our case,
so after filling three images in the first column of ImageView, it moves to
the second column.
struct HorizontalGrid: View {
    var rows: [GridItem] =
        Array(repeating: .init(.flexible()), count: 3)

    var body: some View {
        NavigationView {
            ScrollView(.horizontal) {
                LazyHGrid(rows: rows) {
                    ForEach((1...18), id: \.self) { number in
                        ImageView(number: number)
                    }
                }
            }
            .navigationTitle("Landscapes")
        }
        .navigationViewStyle(StackNavigationViewStyle())
    }
}
To show both grids, replace the content of ContentView with:
struct ContentView: View {
    @State private var currentTab: Int = 0

    var body: some View {
        TabView(selection: $currentTab) {
            VerticalGrid()
                .tabItem {
                    Image(systemName: "rectangle.grid.3x2")
                    Text("Vertical")
                }
                .tag(0)

            HorizontalGrid()
                .tabItem {
                    Image(systemName: "rectangle.grid.2x2")
                    Text("Horizontal")
                }
                .tag(1)
        }
    }
}
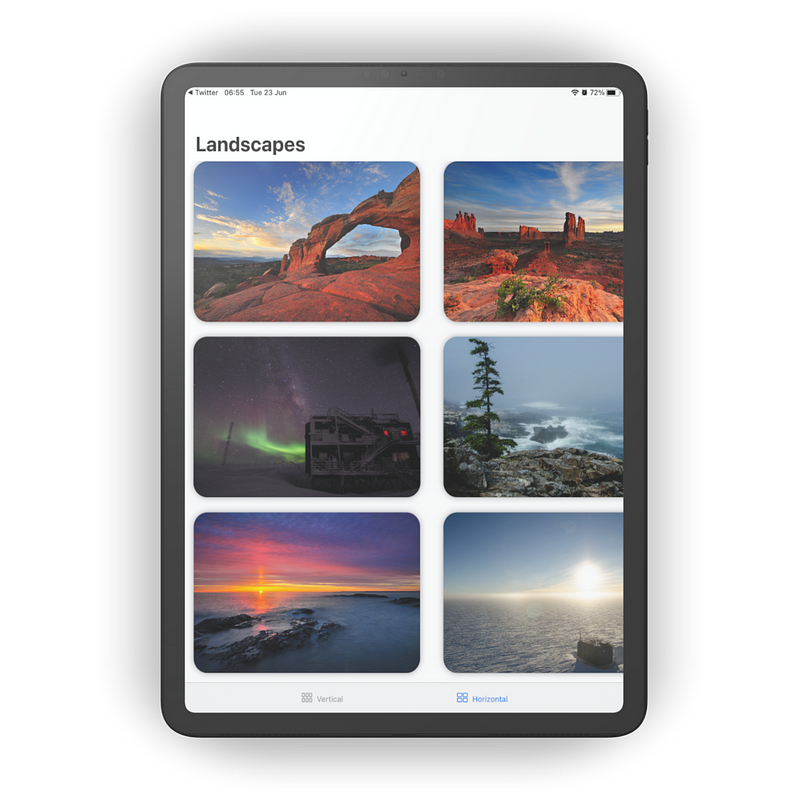
This creates two tabs that you can tap on for the different grid layouts. Running the project gives a beautiful grid of landscapes in both vertical and horizontal directions:


Exploring Freelancing
Navigate freelancing as a developer; find clients, manage contracts, ensure timely payment, and learn from experiences!


