

Exploring Freelancing
Navigate freelancing as a developer; find clients, manage contracts, ensure timely payment, and learn from experiences!
- Introduction
- Creating a new framework
- Creating a new project
- Importing the framework into the project
- Using the Framework in the Project
- Conclusion
Frameworks are great for modularizing your code and breaking down reusable components into a separate code bundle.
Originally written for LogRocket, modified to use it in my blog.
For example, consider an app that provides recording the screen. You move the methods and classes related to recording into a different framework, naming it RecordingKit. This framework is created with reusability in mind and can be used in other scenarios. Also, other engineers can work on it independently.
In this article, you’ll learn these steps:
- Create a framework
- Import it into a project
- Use it in a project
You should have basic knowledge of the Swift language and experience working with Xcode to follow along.
Introduction
We want an investment tracker app with the recent craze over the stock market and cryptocurrency. These will track the prices of stocks on a stock exchange and a few cryptocurrencies, respectively.
The app needs a settings screen, and to maintain consistency, we don’t want to duplicate the code. So, we’ll create a framework called SettingsKit to reuse across our app (or maybe more in the future).
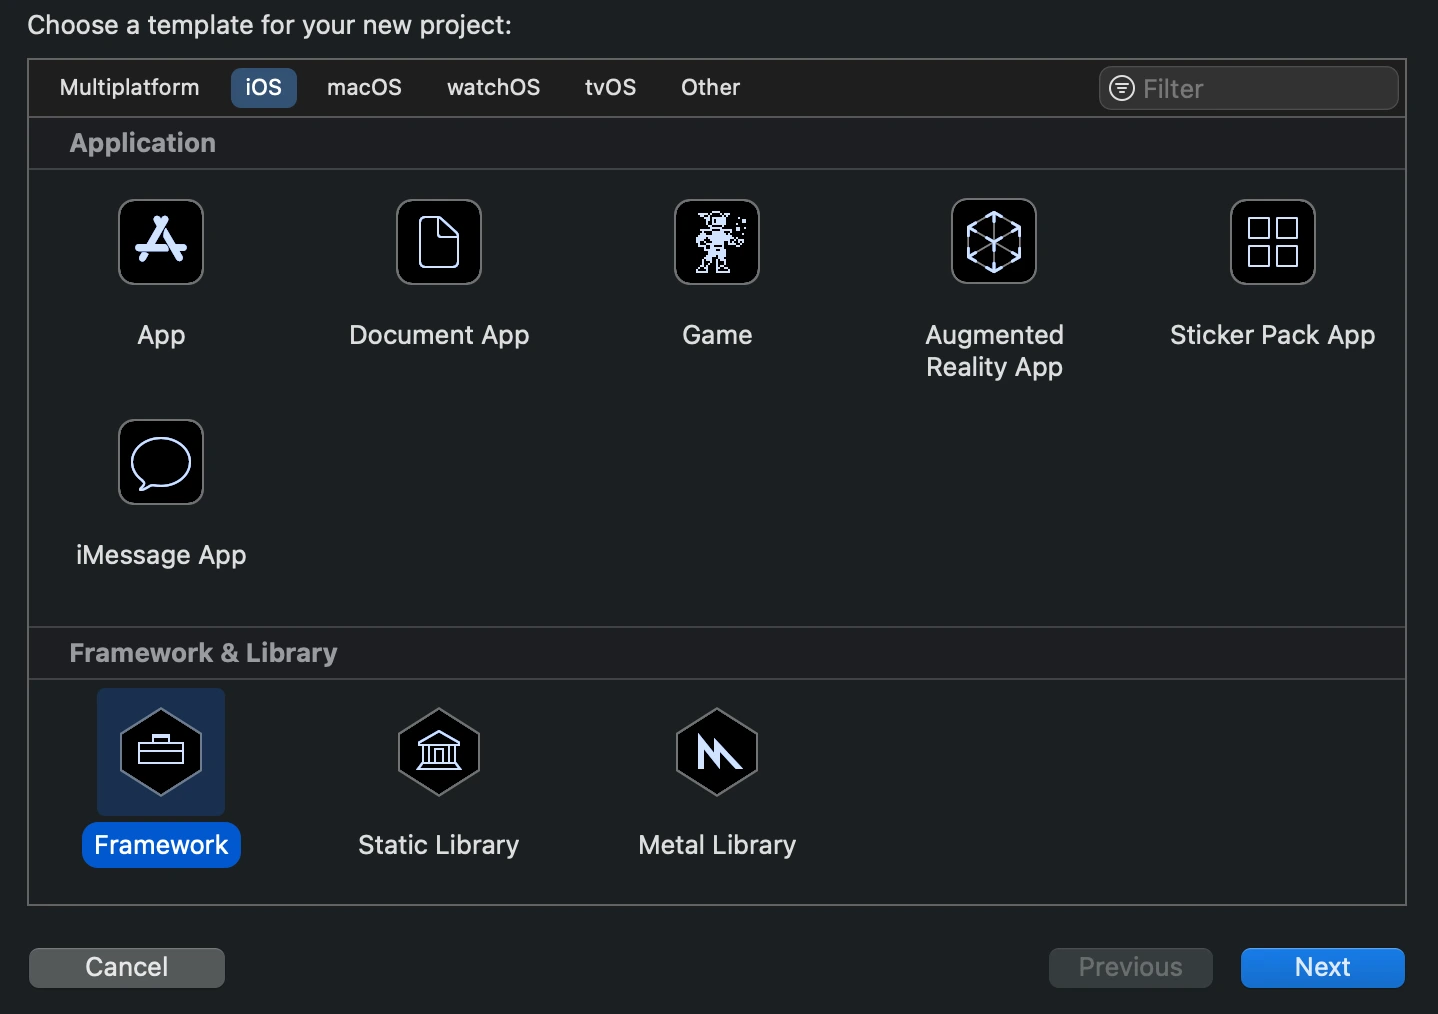
Creating a new framework
Open Xcode and create a new project. Select Framework under the iOS section.
Fill in the template options as follows, then click Next:
- Product Name: SettingsKit
- Organization Identifier: The identifier you want to use for your framework. For example,
com.rudrankriyam.SettingsKit - Language: Swift
- Uncheck the Include Tests option
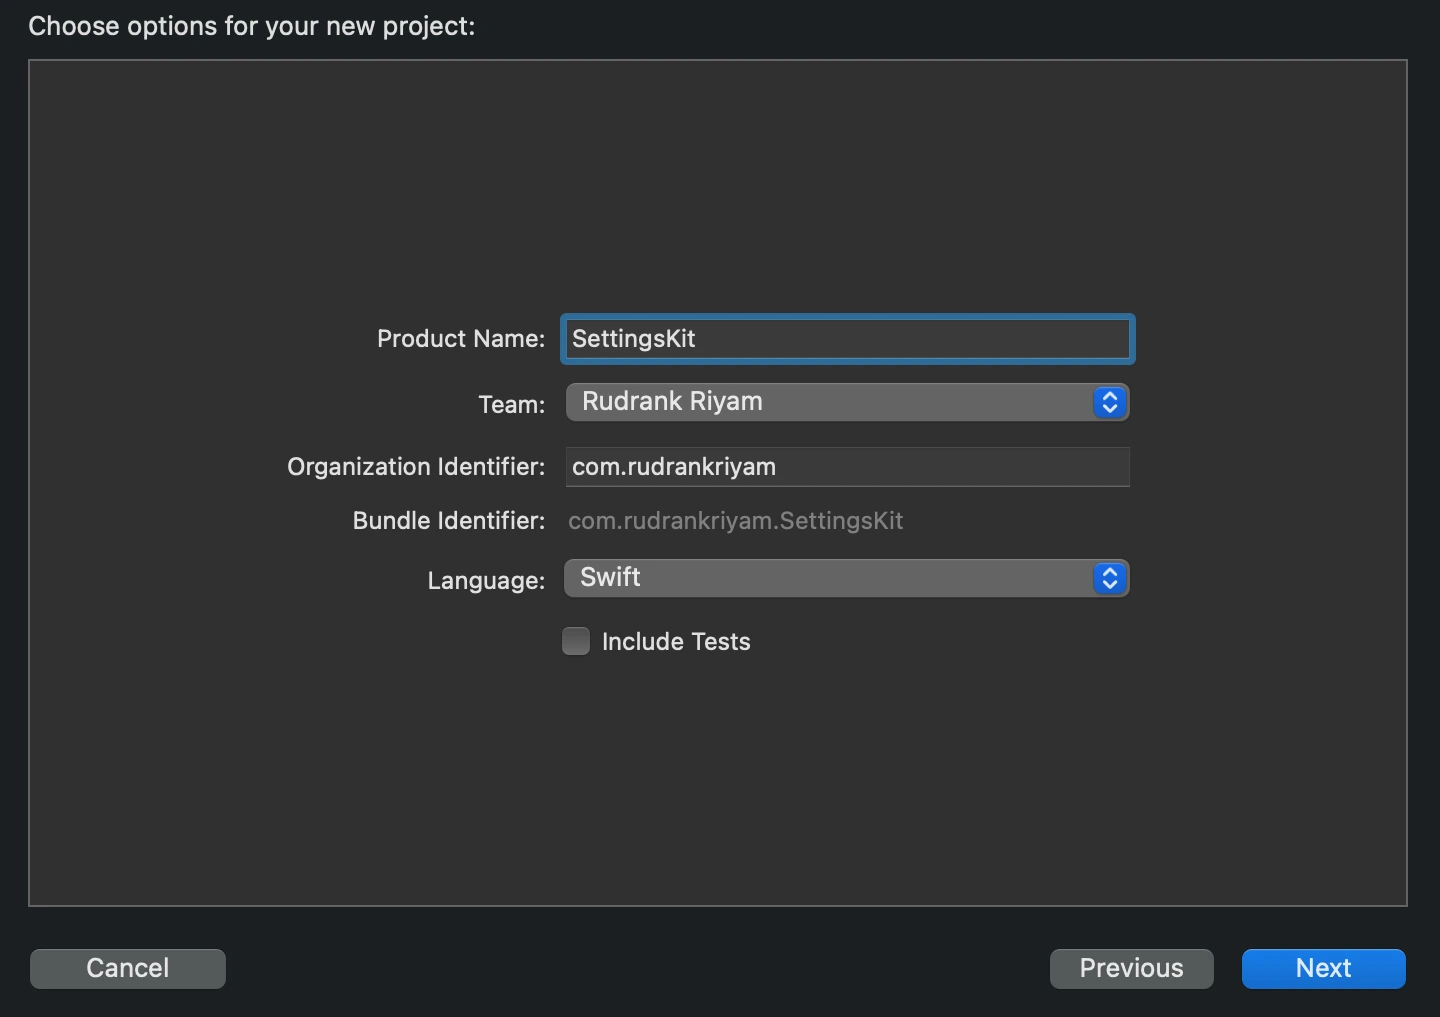
Choose a directory to save the framework, and click Create.
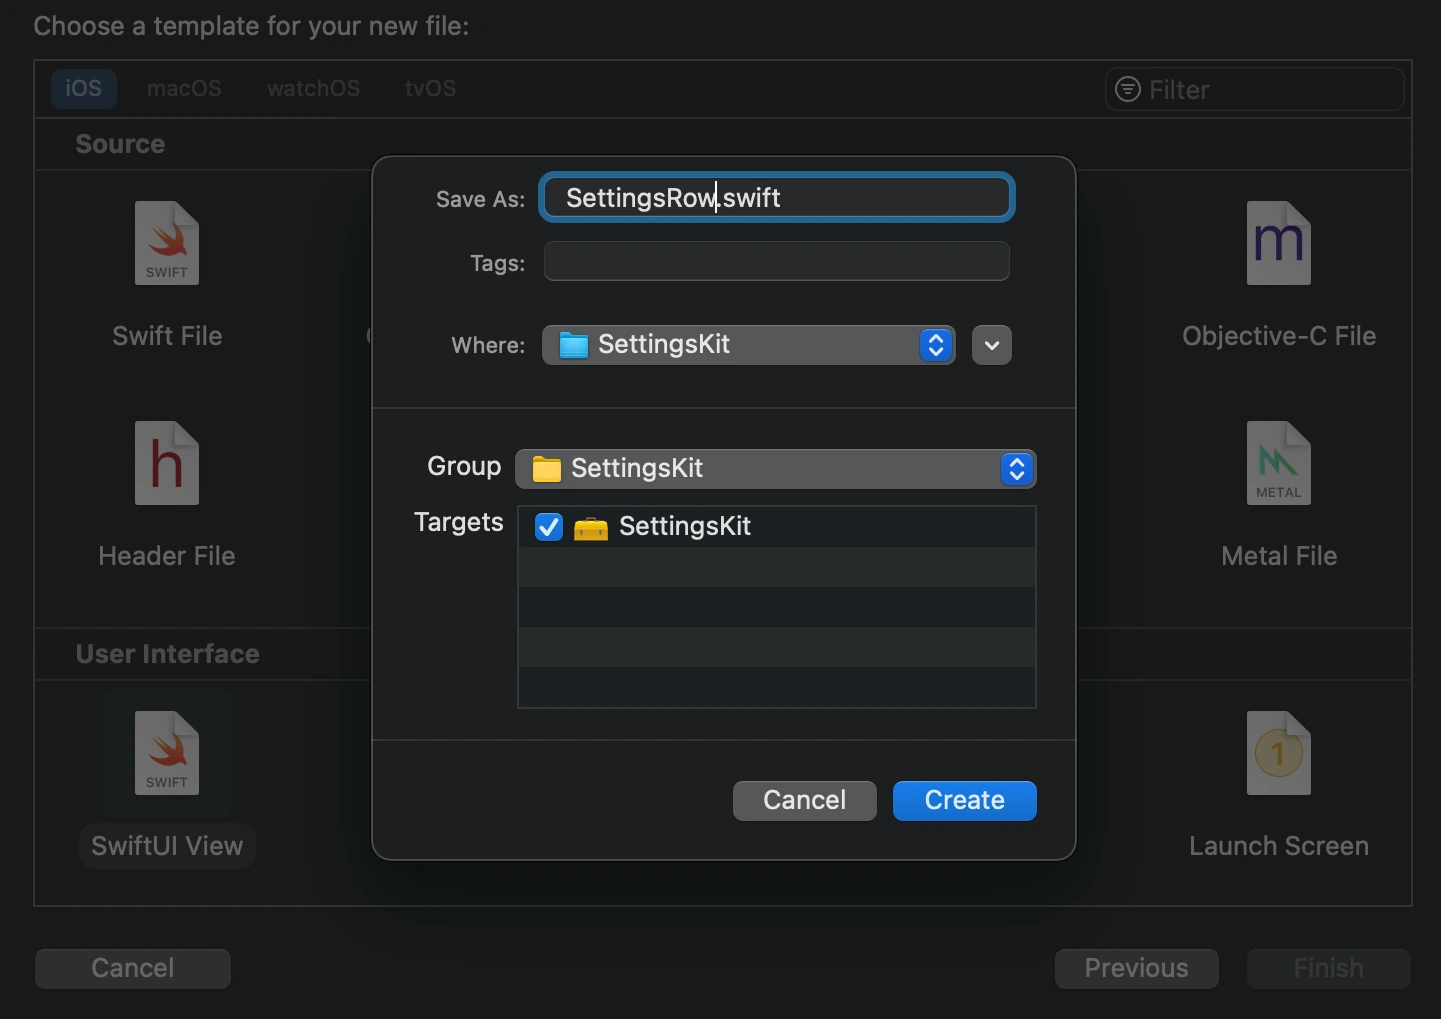
Please create a new SwiftUI view, and name it SettingsRow.swift. This is a generic row with a name and image with a disclosure indicator. Make sure to check the framework in the targets.
Copy the following code for SettingsRow inside the file:
public struct SettingsRow: View {
  private var title: String
  private var image: String
  private var showDisclosure: Bool

  /// A generic settings row which can be customised according to your needs.
  /// - Parameters:
  ///   - title: The title of the row.
  ///   - image: The SF symbol for the row.
  ///   - showDisclosure: Show disclosure icon for action or navigation.
  public init(_ title: String, image: String, showDisclosure: Bool = false) {
    self.image = image
    self.title = title
    self.showDisclosure = showDisclosure
  }

  public var body: some View {
    HStack(spacing: 8) {
      Image(systemName: image)
        .font(.headline)
        .frame(minWidth: 25, alignment: .leading)
        .accessibility(hidden: true)

      Text(title)

      Spacer()

      if showDisclosure {
        Image(systemName: "chevron.right")
          .accessibility(hidden: true)
      }
    }
    .padding(.vertical
    .foregroundColor(.accentColor)
  }
}
This view can be used to show the app version or copyright. In this case, we have the disclosure icon hidden by default. As we want to access the view outside the framework itself and use it in our apps, we change the access level of the struct as public.
Another use case is an action to perform on a row. Create SettingsActionRow.swift, and add the following:
public struct SettingsActionRow: View {
  private var image: String
  private var title: String
  private var action: () -> ()

  /// A generic settings row which can be customised according to your needs.
  /// - Parameters:
  ///   - title: The title of the row.
  ///   - image: The SF symbol for the row.
  ///   - action: The custom action that you want to perform on tapping the row.
  public init(_ title: String, image: String, action: @escaping () -> ()) {
    self.image = image
    self.title = title
    self.action = action
  }

  public var body: some View {
    Button(action: action) {
      SettingsRow(title, image: image, showDisclosure: true)
    }
    .buttonStyle(PlainButtonStyle())
  }
}
The client code provides it with an action, for example, reviewing the app on the store or opening the app’s social accounts.
To navigate to another view, we create another view called SettingsNavigationRow:
public struct SettingsNavigationRow<Destination: View>: View {
  private var title: String
  private var image: String
  private var destination: Destination

  /// A generic settings row which can be customised according to your needs.
  /// - Parameters:
  ///   - title: The title of the row.
  ///   - image: The SF symbol for the row.
  ///   - destination: The view to navigate to, after tapping the row.
  public init(_ title: String, image: String, destination: Destination) {
    self.image = image
    self.title = title
    self.destination = destination
  }

  public var body: some View {
    NavigationLink(destination: destination) {
      SettingsRow(title, image: image, showDisclosure: true)
    }
    .buttonStyle(PlainButtonStyle())
  }
}
After a few similar rows, we group them using a secondary background color, like in the iOS settings screen. Add the following modifier:
public extension View {
  func settingsBackground(cornerRadius: CGFloat = 16,
                          innerPadding: CGFloat = 8,
                          outerPadding: CGFloat = 16) -> some View {
    self
      .padding(.horizontal, 16)
      .padding(.vertical, innerPadding)
      .background(RoundedRectangle(cornerRadius: cornerRadius,
                                   style: .continuous)
                    .fill(Color(.secondarySystemBackground)))
      .padding(outerPadding)
  }
}
With this, we’ve created our first framework ready to be utilized in our apps!
Creating a new project
Open Xcode, select Create a new Xcode project, and select the App template under the iOS header.
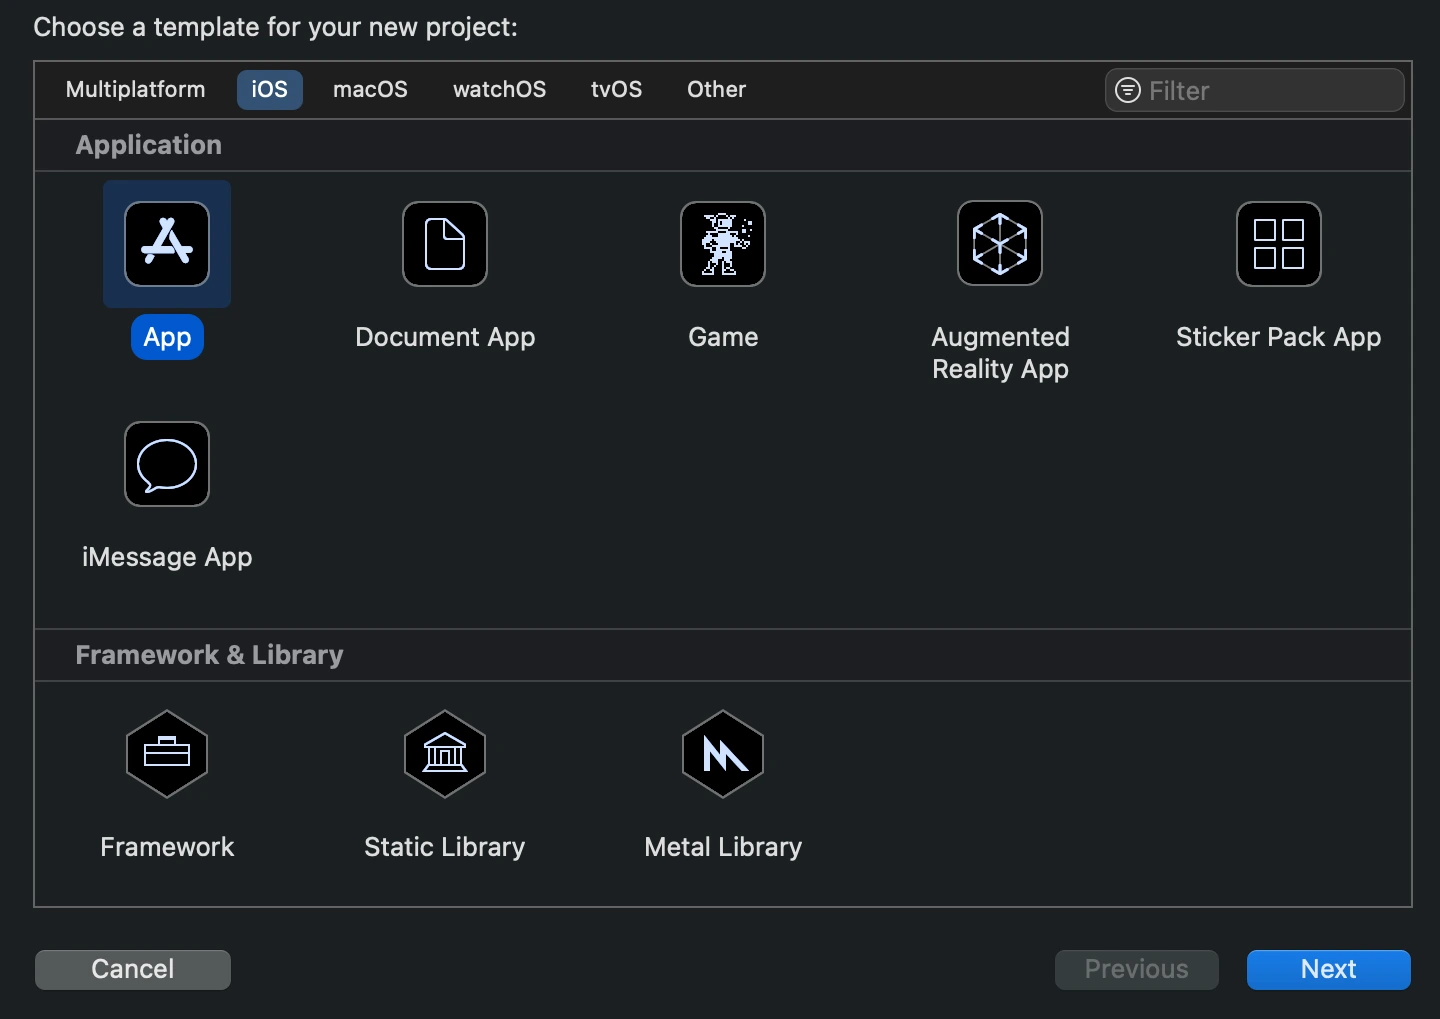
Fill in the template options as follows, then click Next:
- Product Name: Stocktance
- Organization Name: Fill this in however you like
- Organization Identifier: The identifier you use for your apps
- Interface: SwiftUI
- Life Cycle: SwiftUI App
- Language: Swift
- Make sure you’ve unchecked the Use Core Data, Include Tests options
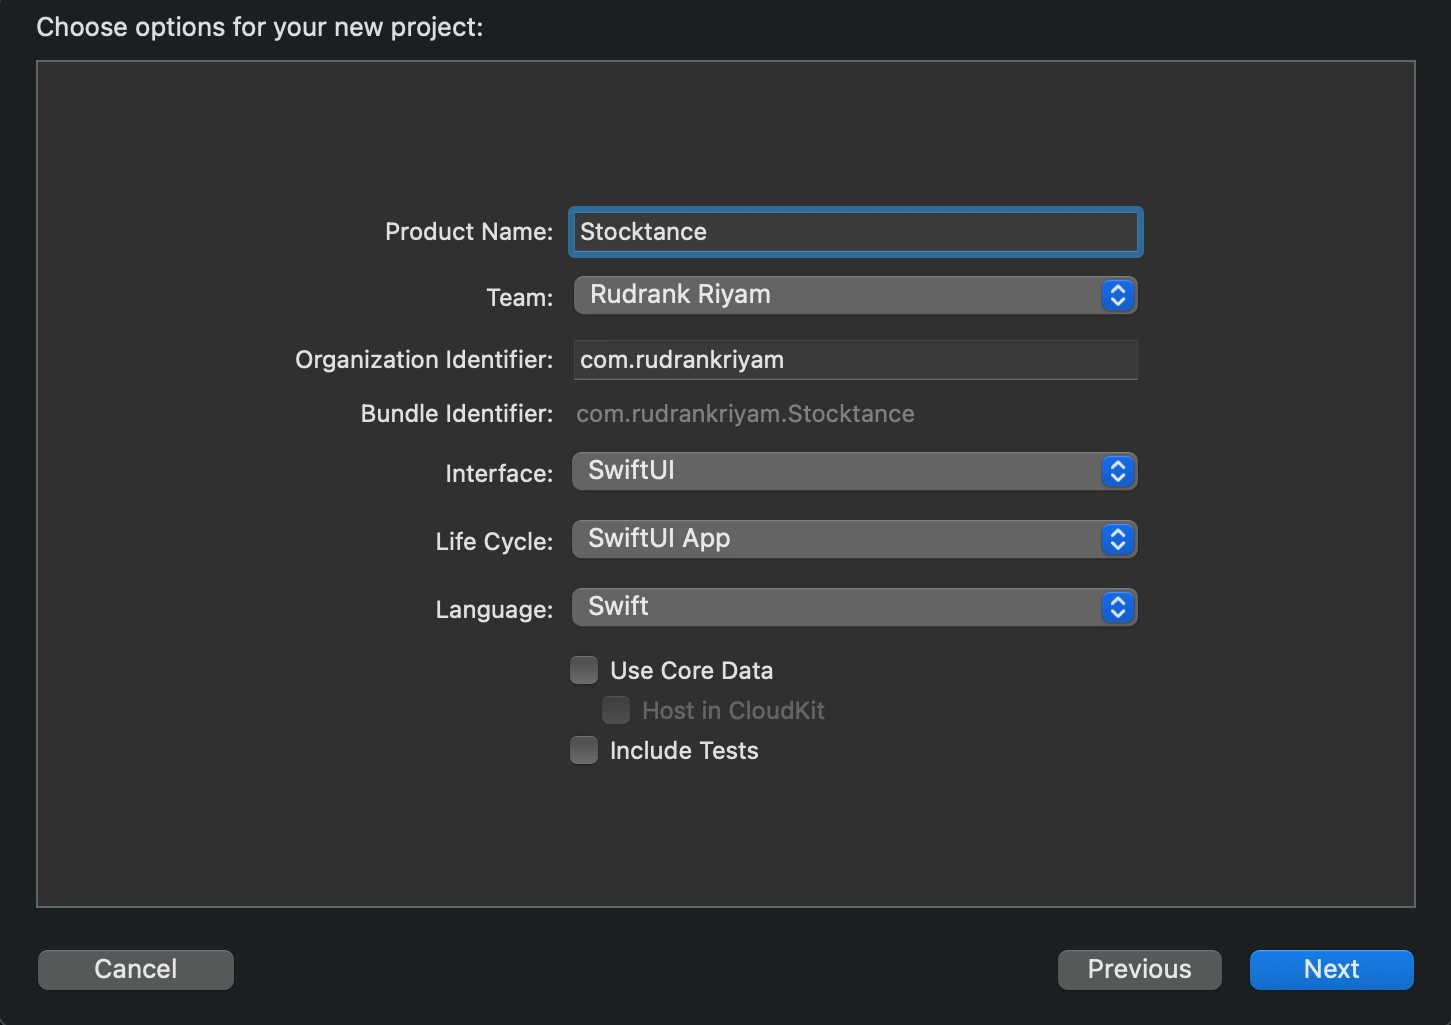
Choose a directory to save our project and click Create.
Importing the framework into the project
There are two ways to add the project to your app:
- Drag the framework into the project navigator, and then add the framework to the target
- Add the framework to the project, and then add the framework to the target
- Both are of a similar type, so we’d prefer the latter option. In the app, select the project from the project navigator, select the Stocktance target, and scroll to Frameworks, Libraries, and Embedded Content.
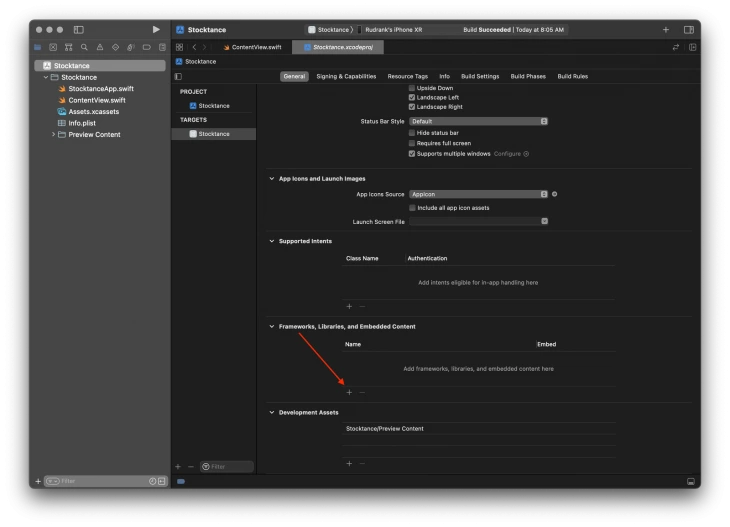
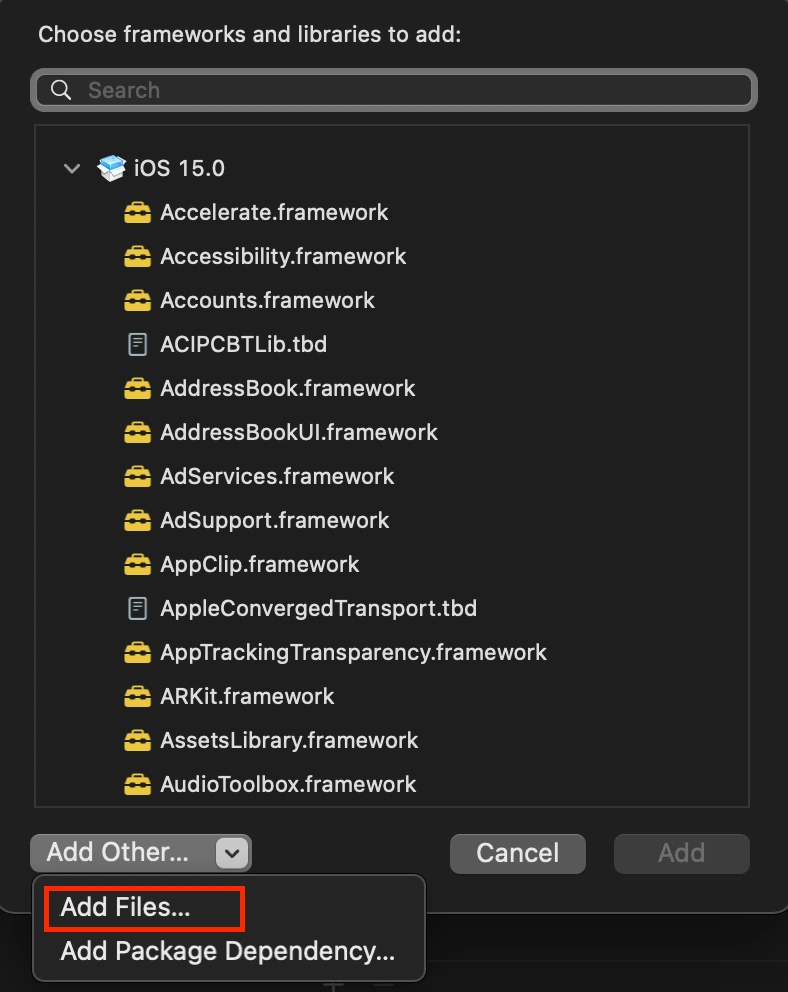
Click on the plus button, click Add Other… and select Add Files…
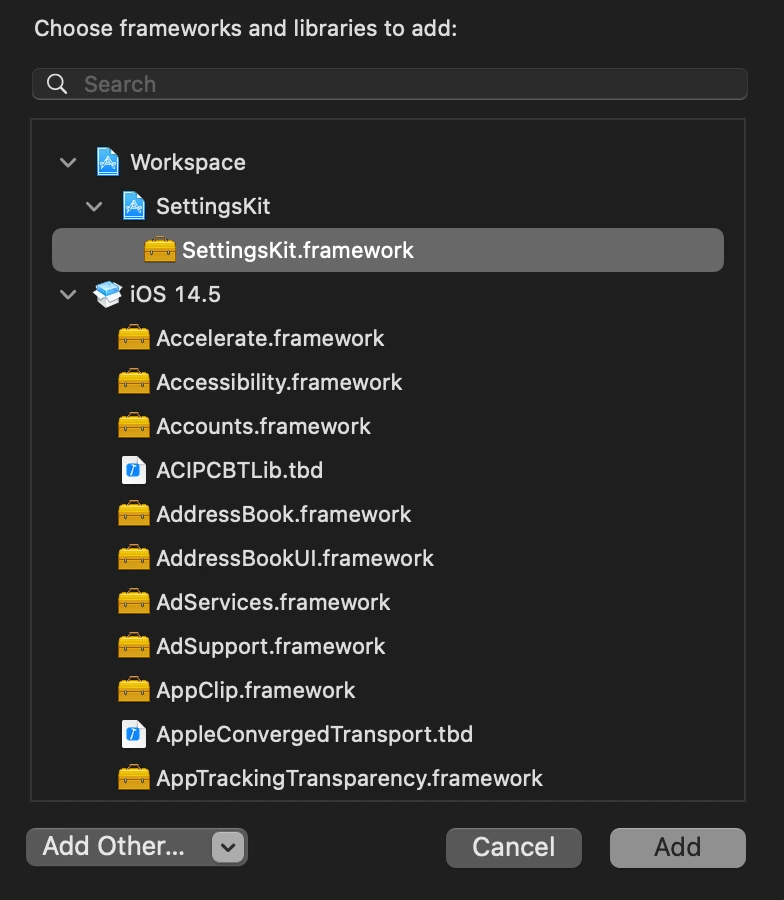
Please navigate to the SettingsKit folder and select it. We’ve added the framework to the project. To add it to our target, click the plus button again, and you’ll find SettingsKit.framework on the top. Select it to add it to our target.
Now, we’ve successfully added the framework to our app! Time to use it!
Using the Framework in the Project
Create a new SwiftUI file called SettingsView in Stocktance, and at the top of the file, import our framework:
import SettingsKit
Just like we import Apple’s SwiftUI framework to take advantage of all they offer, we import our framework to create the settings view.
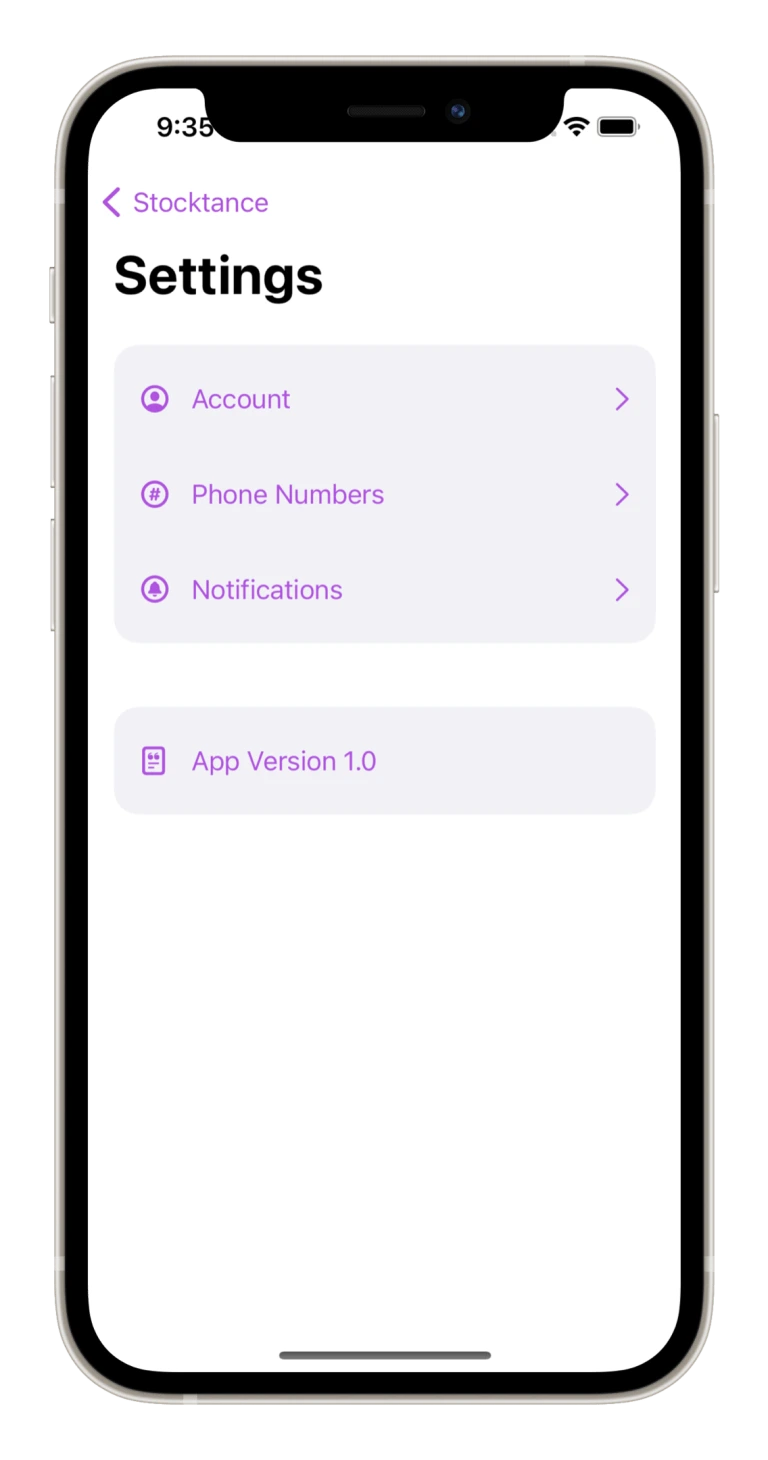
Add the following to the SettingsView:
struct SettingsView: View {
  let appVersion = Bundle.main.infoDictionary?["CFBundleShortVersionString"] as! String

  var body: some View {
    NavigationView {
      ScrollView {
        VStack {
          SettingsNavigationRow("Account", image: "person.crop.circle",
                                destination: Text("Accounts Screen"))

          SettingsNavigationRow("Phone Numbers", image: "number.circle",
                                destination: Text("Phone Screen"))

          SettingsNavigationRow("Notifications", image: "bell.circle",
                                destination: Text("Notifications Screen"))
        }
        .settingsBackground()

        VStack {
          SettingsRow("App Version \(appVersion)", image: "doc.append")
        }
        .settingsBackground()
      }
      .navigationTitle("Settings")
    }
  }
}
With a few lines of code, thanks to the framework we created earlier, we created simple views for our settings screen. You can use this framework in any other app to maintain the consistency of your settings.
To add the SettingsView in the app, copy the following in ContentView.swift:
struct Stock {
  var name: String
  var price: Double
}

extension Stock {
  static let testStocks = [Stock(name: "Banana", price: 125),
                           Stock(name: "TapeBook", price: 320),
                           Stock(name: "Ramalon", price: 3200)]
}

struct ContentView: View {
  var body: some View {
    NavigationView {
      List(Stock.testStocks, id: \.name, rowContent: WatchlistRow.init)
        .navigationTitle("Stocktance")
        .toolbar {
          NavigationLink(destination: SettingsView()) {
            Image(systemName: "gear")
          }
        }
    }
    .accentColor(.purple)
  }
}

struct WatchlistRow: View {
  var stock: Stock

  var body: some View {
    HStack {
      Text(stock.name)

      Spacer()

      Text("$" + String(format: "%.2f", stock.price))
        .foregroundColor(.white)
        .padding(8)
        .background(RoundedRectangle(cornerRadius: 8).fill(Color(.systemGreen)))
    }
    .padding(.vertical)
  }
}
Run the app to see your framework code in action!
Conclusion
As your app scales, it is an excellent plan to break the code into individual components and reusable chunks into frameworks. For example, you can have the networking layer as a framework, isolated from the main app. Or an AnalyticsKit for handling the analytics. If the provider changes, you only have to make changes in the framework, as the primary implementation is separated from the app.
To share your framework as an open-source library or share it internally with the team, you can use Swift Package Manager to manage the code’s distribution.
I hope you enjoyed reading this post! Please let me know for any other feedback/constructive criticism on Twitter!
Exploring Freelancing
Navigate freelancing as a developer; find clients, manage contracts, ensure timely payment, and learn from experiences!